
The Writing Process
Step #1: Prewriting
This stage is to help you get ideas, sort through your thoughts and get them down on paper.
Tools to use:
~graphic organizer
~planning cube
~inspiration
~heart map
~topics anchor chart
This stage is to help you get ideas, sort through your thoughts and get them down on paper.
Tools to use:
~graphic organizer
~planning cube
~inspiration
~heart map
~topics anchor chart
Step #2: Drafting
Now that you have your idea, use your prewriting to begin your draft.
Write!!! You have a plan, now get to it. Use complete sentences and punctuation. Don't worry about spelling and grammar. You will get to that later. You are a writer!
Now that you have your idea, use your prewriting to begin your draft.
Write!!! You have a plan, now get to it. Use complete sentences and punctuation. Don't worry about spelling and grammar. You will get to that later. You are a writer!
|
A good draft looks like?
~Paragraphs are indented ~Paragraphs of 3-5 sentences ~sentences have punctuation and capitals ~Spelling question? circle the word. ~Skip lines |
PICTURE TO COME |

|
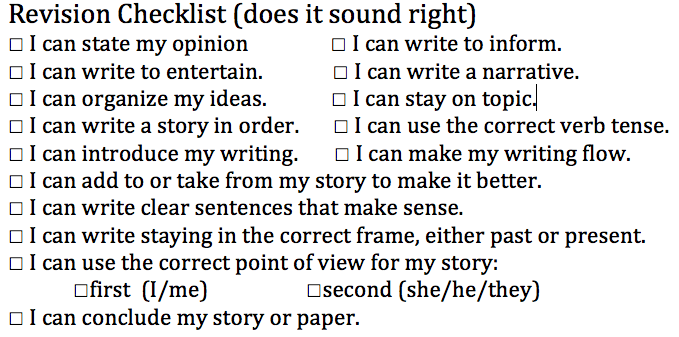
Step #3: Revising
Take your draft and read it to yourself out loud. Use a voice that only you can hear. Did it sound right? Use your revision checklist. Use a RED colored pencil to revise. |

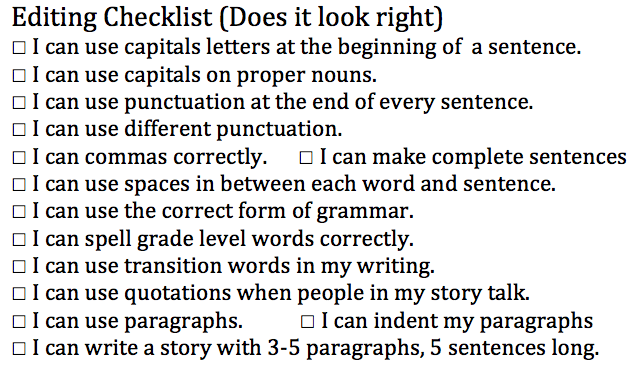
Step #4: Editing
Look over your draft again. Read it again to yourself.
Does it look right? Use your editing checklist.
Use a BLUE colored pencil to edit.
Look over your draft again. Read it again to yourself.
Does it look right? Use your editing checklist.
Use a BLUE colored pencil to edit.
Step #5 Peer Revise and Edit
Choose someone to read your writing to.
Your peer needs to just LISTEN as you read.
They will then read it to you and edit, making corrections, as they see they are needed.
They will then write a star and a wish on your paper.
Use a GREEN colored pencil for this step.
Choose someone to read your writing to.
Your peer needs to just LISTEN as you read.
They will then read it to you and edit, making corrections, as they see they are needed.
They will then write a star and a wish on your paper.
Use a GREEN colored pencil for this step.
Step #6 Teacher Conference
Make an appointment to meet with Ms. Wright or Mr. Dunn.
Please don't interrupt if we are meeting with a student.
Where do you need to be in your writing? How are you going to get there?
Have an idea BEFORE you meet with us.
Make sure you have looked at your exemplars before meeting with us.
Make an appointment to meet with Ms. Wright or Mr. Dunn.
Please don't interrupt if we are meeting with a student.
Where do you need to be in your writing? How are you going to get there?
Have an idea BEFORE you meet with us.
Make sure you have looked at your exemplars before meeting with us.
Step #7 Publish
You will not ALWAYS publish. When you do you will be expected to type your paper.
Use Microsoft Word. Use Spell Check.
AFTER you have typed all of your words, you may change the font, size and color.
Add photos if necessary.
SAVE! SAVE! SAVE
Log in to your Google email and attach the paper and email it to Ms. Wright at [email protected].
You may print AFTER Ms. Wright gives you the okay.
